
티스토리 뷰
라우터 기본설정
enable
conf t
no ip domain lookup
line c 0
exec-timeout 0
logging synchronous
exit
line vty 0 4
password cisco
exit
PC 기본설정
enable
conf t
no ip domain lookup
line c 0
exec-timeout 0
logging synchronous
exit
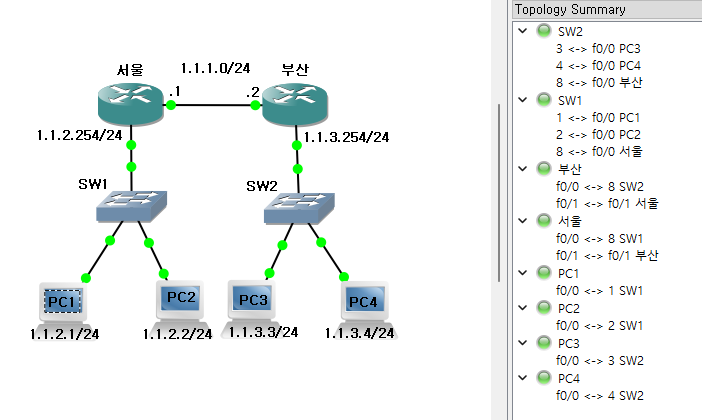
[SEOUL]
hostname SEOUL
int f0/0
no shut
ip add 1.1.2.254 255.255.255.0
int f0/1
no shut
ip add 1.1.1.1 255.255.255.0
exit
ip route 1.1.3.0 255.255.255.0 f0/1 1.1.1.2
do copy r s
[BUSAN]
hostname BUSAN
int f0/0
no shut
ip add 1.1.3.254 255.255.255.0
int f0/1
no shut
ip add 1.1.1.2 255.255.255.0
exit
ip route 1.1.2.0 255.255.255.0 f0/1 1.1.1.1
do copy r s
[PC1]
hostname PC1
ip default-gateway 1.1.2.254
no ip routing
hostname PC1
int f0/0
no shut
ip add 1.1.2.1 255.255.255.0
exit
do copy r s
[PC2]
hostname PC2
ip default-gateway 1.1.2.254
no ip routing
hostname PC2
int f0/0
no shut
ip add 1.1.2.2 255.255.255.0
exit
do copy r s
[PC3]
hostname PC3
ip default-gateway 1.1.3.254
no ip routing
hostname PC3
int f0/0
no shut
ip add 1.1.3.3 255.255.255.0
exit
do copy r s
[PC4]
hostname PC4
ip default-gateway 1.1.3.254
no ip routing
hostname PC4
int f0/0
no shut
ip add 1.1.3.4 255.255.255.0
exit
do copy r s
------------------------------------------
# 라우터 기본 명령어
enable(ena)
유저(>)모드에서 관리자(#)모드로 이동
configure terminal(conf t)
관리자모드에서 전체설정모드로 이동
line console 0
콜솔 설정모드로 이동
line vty
가상터미널 설정모드로 이동
show running-config(sh run)
// 현재 모든 설정 보기
show ip interface brief(sh ip int b)
// 현재 모든 단자 상태 확인
show ip route
// 라우팅 테이블 확인
no ip domain lookup
명령어 오타났을 때 줄바꿔 대기해라
logging syncronous
// 로그메시지와 명령어가 섞이지 않게 줄바꿔 대기해라
write memory = copy r s
// 현재 설정을 nvram에 저장해라
exec-timeout 0
// 현재 접속해 있는 곳에서 영원히 머물러라
enable password(ena pass)
유저모드에서 관리자모드로 들어갈 때 암호지정
------------------------------------------
ip값, 네트워크 재설정하는 과정...
SEOUL(config)#int f0/0
SEOUL(config-if)#no ip add
SEOUL(config-if)#exit
SEOUL(config)#int f0/1
SEOUL(config-if)#no ip add
SEOUL(config-if)#exit
SEOUL(config)#no ip route 1.1.20.128 255.255.255.128 f0/1 1.1.10.132
BUSAN(config)#int f0/0
BUSAN(config-if)#no ip add
BUSAN(config-if)#exit
BUSAN(config)#int f0/1
BUSAN(config-if)#no ip add
BUSAN(config-if)#exit
BUSAN(config)#no ip route 1.1.20.0 255.255.255.128 f0/1 1.1.10.131
PC1(config)#no ip default-gateway 1.1.20.126
PC1(config)#int f0/0
PC1(config-if)#no ip add
PC2(config)#no ip default-gateway 1.1.20.126
PC2(config)#int f0/0
PC2(config-if)#no ip add
PC3(config)#no ip default-gateway 1.1.20.254
PC3(config)#int f0/0
PC3(config-if)#no ip add
PC4(config)#no ip default-gateway 1.1.20.254
PC4(config)#int f0/0
PC4(config-if)#no ip add
------------------------------------------
AT->ATX
20필 3.3v
내부버스 cpu -mch(사우스브릿지)
외부버스 그 외에
요즈음에는 pch로 통합되어서 메모리나 그래픽이 바로 cpu에 바로 연결
시스템버스로 칭함
'네트워크 > LAB실습 및 이론' 카테고리의 다른 글
| [keduit]ppp프로토콜, lmi-프레임릴레이 -2023/02/17,20 (0) | 2023.02.21 |
|---|---|
| [keduit]데이터통신기능, osi7계층, 라우터ppp통신 -2023/02/16 (0) | 2023.02.16 |
| [keduit]ip문제, GNS3기초 -2023/02/14 (0) | 2023.02.15 |
| [keduit]데이터통신요소, IP,서브넷 마스크 -2023/02/13 (0) | 2023.02.13 |
| [keduit]-2023/02/08~10 (0) | 2023.02.12 |